> For the complete documentation index, see [llms.txt](https://guides.mangoapps.com/llms.txt). Markdown versions of documentation pages are available by appending `.md` to page URLs; this page is available as [Markdown](https://guides.mangoapps.com/integrations-guide/mobile-device-management/microsoft-intune-configuration.md).

# Microsoft Intune Configuration

Android and iOS configuration using Microsoft Intune

### Overview

This guide explains how to configure and manage the MangoApps mobile application on Android and iOS devices using **Microsoft Intune**. It is designed for IT administrators responsible for deploying and managing MangoApps within their organization.&#x20;

<figure><img src="https://1627138357-files.gitbook.io/~/files/v0/b/gitbook-x-prod.appspot.com/o/spaces%2F-LjKbJ2ssjhlUZRcGOXW%2Fuploads%2Fw23PO9Otzag0zGqWxG1S%2Fimage.png?alt=media&amp;token=c99cfdfa-9dd4-46b6-83e8-74e59a846d77" alt=""><figcaption></figcaption></figure>

This document covers configuration steps for both Mobile Device Management (MDM) and Mobile Application Management (MAM), ensuring secure access and data protection for corporate users.

***

### **Prerequisite Roles**

Before beginning, ensure that the correct roles and licenses are in place:

* **Notify MangoApps:** Contact your MangoApps Technical Account Manager before starting configuration.
* **Microsoft Intune Administrator:** The user performing setup from the Azure portal.
* **Licensing Requirements:**
  * **SMBs:** Microsoft 365 Business Premium.
  * **Enterprises:** Microsoft 365 E3/E5, or EMS E3/E5 with M365 plans.
  * **Only MDM Needed:** Microsoft Intune standalone license.

***

### **A. Configure MangoApps for Android in Intune**

This section details how to create and assign the MangoApps Android app in Microsoft Intune.

#### **Steps:**

1. Log in to the [Intune Portal](https://intune.microsoft.com/) with administrator credentials.
2. Create a new app and navigate to **Apps → Android store app** or **Managed Google Play Store → Select** from the right hand pop-up menu.

<figure><img src="https://1627138357-files.gitbook.io/~/files/v0/b/gitbook-x-prod.appspot.com/o/spaces%2F-LjKbJ2ssjhlUZRcGOXW%2Fuploads%2FlKhGIsoBwWPAmJ5vVGyJ%2Fhtsrtet.png?alt=media&amp;token=4ab4d5fc-c1e9-4ffe-beea-3d7c03d481df" alt="" width="563"><figcaption></figcaption></figure>

3. Add the following details:

* **Name:** MangoApps
* **Description:** MangoApps
* **Publisher:** MangoApps
* **App Store URL:** <https://play.google.com/store/apps/details?id=com.ms.engage>
* **Show this featured app in Company Portal:** Yes

<figure><img src="https://1627138357-files.gitbook.io/~/files/v0/b/gitbook-x-prod.appspot.com/o/spaces%2F-LjKbJ2ssjhlUZRcGOXW%2Fuploads%2Fkc3DiQHsZ78cPhvGUIr7%2Frthrthder.png?alt=media&amp;token=644761ff-c3b0-4309-84d3-a9079f4c987d" alt="" width="563"><figcaption></figcaption></figure>

4. **Assignments:** Add the user group(s) that should have access to this app.

<figure><img src="https://1627138357-files.gitbook.io/~/files/v0/b/gitbook-x-prod.appspot.com/o/spaces%2F-LjKbJ2ssjhlUZRcGOXW%2Fuploads%2Fc2mbnssSwLpNOEV43QIy%2Fsrthrtjhrtj.png?alt=media&amp;token=32464c8f-c82a-4b3a-9f7f-51cc84ab5466" alt="" width="563"><figcaption></figcaption></figure>

5. **Review + Create:** Confirm details and create the application.

<figure><img src="https://1627138357-files.gitbook.io/~/files/v0/b/gitbook-x-prod.appspot.com/o/spaces%2F-LjKbJ2ssjhlUZRcGOXW%2Fuploads%2FxgVrx2sc9AcTZ1QH6DNk%2Fytjtyjrty.png?alt=media&amp;token=776e8fd8-573c-41e2-926a-fea110da8361" alt="" width="563"><figcaption></figcaption></figure>

***

### **B. Create a Protection Policy for Android**

To safeguard data within MangoApps, configure an App Protection Policy in Intune.

#### **Steps:**

1. Navigate to **Android Apps → Protection → Create**.

<figure><img src="https://1627138357-files.gitbook.io/~/files/v0/b/gitbook-x-prod.appspot.com/o/spaces%2F-LjKbJ2ssjhlUZRcGOXW%2Fuploads%2Fl4bHIwjpxbAhIL1buMVr%2Ftyjktryujkrt6y.png?alt=media&amp;token=1a0d6460-25c9-4775-abba-4d825659434b" alt="" width="563"><figcaption></figcaption></figure>

2. Under **Basics**, enter:

* **Name:** MangoApps
* **Description:** MangoApps

3. Under **Apps**, set *Target policy to* “Selected apps” → Choose **MangoApps, Work from Anywhere** from Public apps.

<figure><img src="https://1627138357-files.gitbook.io/~/files/v0/b/gitbook-x-prod.appspot.com/o/spaces%2F-LjKbJ2ssjhlUZRcGOXW%2Fuploads%2Fkg0OMqs3tfwEr4hYooT6%2Fsfgrtghre.png?alt=media&amp;token=7127a8f5-47b5-4a19-86f7-a0ab6a99f1cc" alt="" width="563"><figcaption></figcaption></figure>

4. **Data Protection:** Configure settings according to your organization’s policies.

<figure><img src="https://1627138357-files.gitbook.io/~/files/v0/b/gitbook-x-prod.appspot.com/o/spaces%2F-LjKbJ2ssjhlUZRcGOXW%2Fuploads%2FtMS8Qlmw8ebGpIi47EWu%2Frtjhtrr.png?alt=media&amp;token=6be91295-6f97-4f0a-9ec5-94debe313eda" alt="" width="563"><figcaption></figcaption></figure>

5. **Access Requirements:** Adjust based on security preferences.

<figure><img src="https://1627138357-files.gitbook.io/~/files/v0/b/gitbook-x-prod.appspot.com/o/spaces%2F-LjKbJ2ssjhlUZRcGOXW%2Fuploads%2FhwvVU2XR1MHVIadxMEWC%2Frjtfkuyyt.png?alt=media&amp;token=410036df-78d1-445c-a236-4b55443f7228" alt="" width="563"><figcaption></figcaption></figure>

6. **Conditional Launch:** Define conditions for launching the app as per company policy.

<figure><img src="https://1627138357-files.gitbook.io/~/files/v0/b/gitbook-x-prod.appspot.com/o/spaces%2F-LjKbJ2ssjhlUZRcGOXW%2Fuploads%2Fd3mt1fTAcyAu3LPhBknT%2Ftkmtyukr.png?alt=media&amp;token=07da7b37-2f68-46e0-a28f-4a5da369f351" alt="" width="563"><figcaption></figcaption></figure>

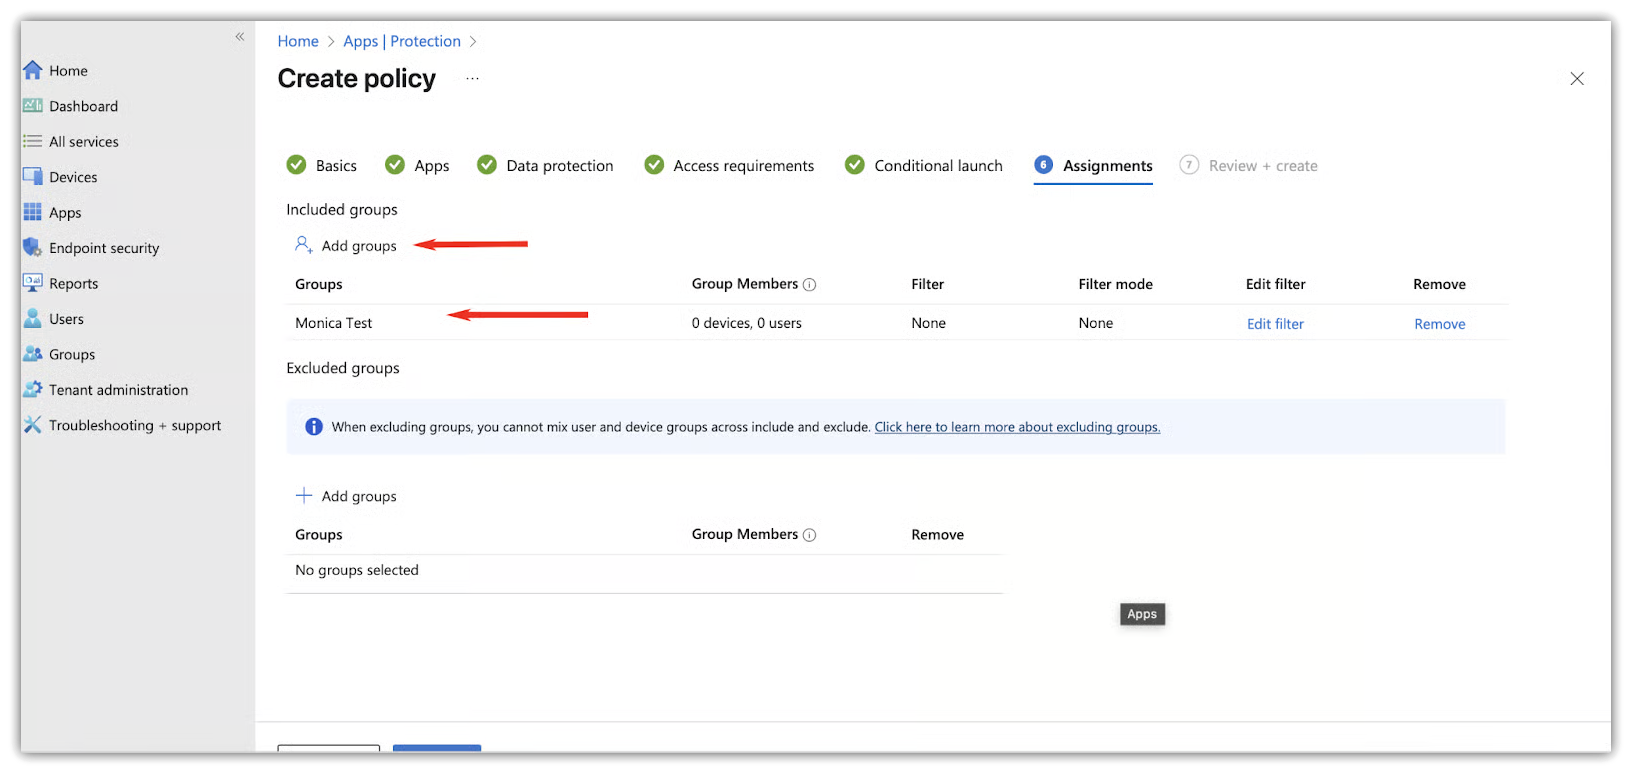
7. **Assignments:** Add the same group(s) used in the Android app setup.

<figure><img src="https://1627138357-files.gitbook.io/~/files/v0/b/gitbook-x-prod.appspot.com/o/spaces%2F-LjKbJ2ssjhlUZRcGOXW%2Fuploads%2FPAixUfulxwRWgfbr1ODe%2Fsrjsrt.png?alt=media&amp;token=2dd1584f-41f3-4d0a-826c-6187f21fb4e8" alt="" width="563"><figcaption></figcaption></figure>

8. **Review + Save** to finalize the policy.

***

### **C. Configure MangoApps for iOS in Intune**

Follow these steps to deploy MangoApps to iOS users using Microsoft Intune.

#### **Steps:**

1. In the Intune portal, go to **Apps → iOS/iPadOS apps → Create**.

<figure><img src="https://1627138357-files.gitbook.io/~/files/v0/b/gitbook-x-prod.appspot.com/o/spaces%2F-LjKbJ2ssjhlUZRcGOXW%2Fuploads%2F6ZWZ8XHNcSvv911CfeSN%2Frtjtyre.png?alt=media&amp;token=2fe096bf-e5a3-4117-a153-737b59647a3c" alt="" width="563"><figcaption></figcaption></figure>

2. Choose **App type → iOS store app → Select**.

<figure><img src="https://1627138357-files.gitbook.io/~/files/v0/b/gitbook-x-prod.appspot.com/o/spaces%2F-LjKbJ2ssjhlUZRcGOXW%2Fuploads%2Fh35cJNnRuqRjKMzpk6Wc%2Fggh.png?alt=media&amp;token=df347695-769c-4be5-bac6-d1e53b105a3c" alt="" width="563"><figcaption></figcaption></figure>

3. In **App Information**, search the App Store for “MangoApps.”

<figure><img src="https://1627138357-files.gitbook.io/~/files/v0/b/gitbook-x-prod.appspot.com/o/spaces%2F-LjKbJ2ssjhlUZRcGOXW%2Fuploads%2FWkAAzkfz1ITMLCh826eq%2Fgfyjdtyjtr.png?alt=media&amp;token=4d0d67d7-14fd-467e-ae56-0fe738b51436" alt="" width="563"><figcaption></figcaption></figure>

4. Enable **Show this as featured app in the Company Portal**.

<figure><img src="https://1627138357-files.gitbook.io/~/files/v0/b/gitbook-x-prod.appspot.com/o/spaces%2F-LjKbJ2ssjhlUZRcGOXW%2Fuploads%2FLMr96cFmtNc4ZeRibGCN%2Ftkuytk.png?alt=media&amp;token=c789bb55-63bb-4d53-b6d8-3a6fcd5a89f3" alt="" width="563"><figcaption></figcaption></figure>

5. **Assignments:** Add relevant user groups.

<figure><img src="https://1627138357-files.gitbook.io/~/files/v0/b/gitbook-x-prod.appspot.com/o/spaces%2F-LjKbJ2ssjhlUZRcGOXW%2Fuploads%2FdfY0fAH0ZVABfcvTZ5L2%2Ftykjtktr.png?alt=media&amp;token=0e514d31-d54c-4afe-81e2-919e7ae8a50c" alt=""><figcaption></figcaption></figure>

6. **Review + Create** to finalize.

<figure><img src="https://1627138357-files.gitbook.io/~/files/v0/b/gitbook-x-prod.appspot.com/o/spaces%2F-LjKbJ2ssjhlUZRcGOXW%2Fuploads%2FJNrWBkTCSeLLNsMZeRr0%2Fgukyu.png?alt=media&amp;token=cb3cbf9f-a660-4860-bd5b-8958a6e494fa" alt="" width="563"><figcaption></figcaption></figure>

***

### **D. Create a Protection Policy for iOS**

App protection policies on iOS ensure that MangoApps data remains secure on mobile devices.

#### **Steps:**

1. Navigate to **iOS Apps → Protection → Create**.

<figure><img src="https://1627138357-files.gitbook.io/~/files/v0/b/gitbook-x-prod.appspot.com/o/spaces%2F-LjKbJ2ssjhlUZRcGOXW%2Fuploads%2FdSnmZ3In23UxuOtbWx5p%2Fdtyjdstryj.png?alt=media&amp;token=ddb91879-478b-4c1a-bd16-858fa5893d14" alt="" width="563"><figcaption></figcaption></figure>

2. Under **Basics**, fill in:

* **Name:** MangoApps
* **Description:** MangoApps

<figure><img src="https://1627138357-files.gitbook.io/~/files/v0/b/gitbook-x-prod.appspot.com/o/spaces%2F-LjKbJ2ssjhlUZRcGOXW%2Fuploads%2FPoQ4FMxZBzgS48b0Xruu%2Ftuke6t.png?alt=media&amp;token=d6ee3540-cd58-4817-b7cc-d05ab24799ca" alt="" width="563"><figcaption></figcaption></figure>

3. Under **Apps**, set *Target policy to* “Selected Apps.”

* Select **Public Apps → Search “MangoApps” → Select MangoApps, Work from Anywhere.**

<figure><img src="https://1627138357-files.gitbook.io/~/files/v0/b/gitbook-x-prod.appspot.com/o/spaces%2F-LjKbJ2ssjhlUZRcGOXW%2Fuploads%2FHi8hcksIN4hgXiGuqmUM%2Ffghmdfthtg.png?alt=media&amp;token=567fa7c6-3f82-4c42-985e-9a979bfe1ede" alt=""><figcaption></figcaption></figure>

4. **Data Protection:** Configure settings based on organizational needs.

<figure><img src="https://1627138357-files.gitbook.io/~/files/v0/b/gitbook-x-prod.appspot.com/o/spaces%2F-LjKbJ2ssjhlUZRcGOXW%2Fuploads%2Fvyv4SdM3jA4qiYaAUkoq%2Fdtkydetyukde.png?alt=media&amp;token=db76cfb1-a8fd-4957-aee1-d70d587d12e2" alt="" width="563"><figcaption></figcaption></figure>

5. **Access Requirements:** Define authentication or compliance criteria.

<figure><img src="https://1627138357-files.gitbook.io/~/files/v0/b/gitbook-x-prod.appspot.com/o/spaces%2F-LjKbJ2ssjhlUZRcGOXW%2Fuploads%2FAtNTuh7SnHwv1rD9rImt%2Fsrthsrtss.png?alt=media&amp;token=02b255ba-1330-44b4-92d7-5b79c3b863ac" alt="" width="563"><figcaption></figcaption></figure>

6. **Conditional Launch:** Set launch conditions aligned with company policies.

<figure><img src="https://1627138357-files.gitbook.io/~/files/v0/b/gitbook-x-prod.appspot.com/o/spaces%2F-LjKbJ2ssjhlUZRcGOXW%2Fuploads%2FEYvhIONZcYh9MIMVSMHV%2Fsrjtrys.png?alt=media&amp;token=0448dfec-baaa-46ba-b22e-f47d730dfa3e" alt="" width="563"><figcaption></figcaption></figure>

7. **Assignments:** Add the same group(s) used during iOS app creation.

<figure><img src="https://1627138357-files.gitbook.io/~/files/v0/b/gitbook-x-prod.appspot.com/o/spaces%2F-LjKbJ2ssjhlUZRcGOXW%2Fuploads%2FBorqyuuIuJRjgG2H87zj%2Fdtyjdtryjd.png?alt=media&amp;token=3b95cd62-1830-4308-9903-8cc0ee068742" alt="" width="563"><figcaption></figcaption></figure>

8. **Review + Create** to complete the policy.

***

### **E. Configure MangoApps with Azure SSO**

Single Sign-On (SSO) integration allows users to securely access MangoApps using Azure credentials.

#### **Steps:**

1. Log in to **MangoApps Admin Portal**.
2. Go to **SSO → Connections → SAML tab → Add SSO Connection**.

<figure><img src="https://1627138357-files.gitbook.io/~/files/v0/b/gitbook-x-prod.appspot.com/o/spaces%2F-LjKbJ2ssjhlUZRcGOXW%2Fuploads%2FbbxMpftxIBddCEfi0HIL%2Ftryjtkye.png?alt=media&amp;token=3e52a9e2-ce5f-4d82-8938-57c95e380de5" alt="" width="563"><figcaption></figcaption></figure>

3. Choose **Azure** as the identity provider and name the connection.

<figure><img src="https://1627138357-files.gitbook.io/~/files/v0/b/gitbook-x-prod.appspot.com/o/spaces%2F-LjKbJ2ssjhlUZRcGOXW%2Fuploads%2F0c4Q4e8UWkKK6ZeYxNT7%2Fdtkmdtm.png?alt=media&amp;token=8b0e3614-0957-4112-be48-bce3dc3c4096" alt="" width="563"><figcaption></figcaption></figure>

4. In the Azure app you created, navigate to **Manage Settings → Configure Manually → Copy the ACS URL (HTTPS)**.

<figure><img src="https://1627138357-files.gitbook.io/~/files/v0/b/gitbook-x-prod.appspot.com/o/spaces%2F-LjKbJ2ssjhlUZRcGOXW%2Fuploads%2FqneaIhLE8NL0F8Kf3vsy%2Fsrtjdtyr.png?alt=media&amp;token=d02c02b6-0947-413e-8032-c053d638a730" alt=""><figcaption></figcaption></figure>

5. Add the **metadata URL** in the MangoApps admin section under **Metadata** and click **Read from URL**.

<figure><img src="https://1627138357-files.gitbook.io/~/files/v0/b/gitbook-x-prod.appspot.com/o/spaces%2F-LjKbJ2ssjhlUZRcGOXW%2Fuploads%2FN7dhRxqnctCwu21eOSe6%2Ftjyfgh.png?alt=media&amp;token=f0b2ada9-959d-408a-9389-58b1ab555375" alt="" width="563"><figcaption></figcaption></figure>

6. Under **Configure Manually**, change **Issuer URL/Entity ID** to match your MangoApps domain (e.g., `https://abc.mangoapps.com`).

<figure><img src="https://1627138357-files.gitbook.io/~/files/v0/b/gitbook-x-prod.appspot.com/o/spaces%2F-LjKbJ2ssjhlUZRcGOXW%2Fuploads%2FT58bWLv1ptq2m0ezqGAt%2Ffyukt.png?alt=media&amp;token=0e6a234c-b4eb-40f7-b5c3-ccb6b6a1a983" alt="" width="563"><figcaption></figcaption></figure>

7. Save the configuration.