TinyTake/Recorder FAQ
What is TinyTake and how do I use it?
Instantly share a screen capture image, video or a file with your followers in MangoApps using TinyTake . Read through the questions and answers below. By the end of the article you will know the answers to:
What is TinyTake?
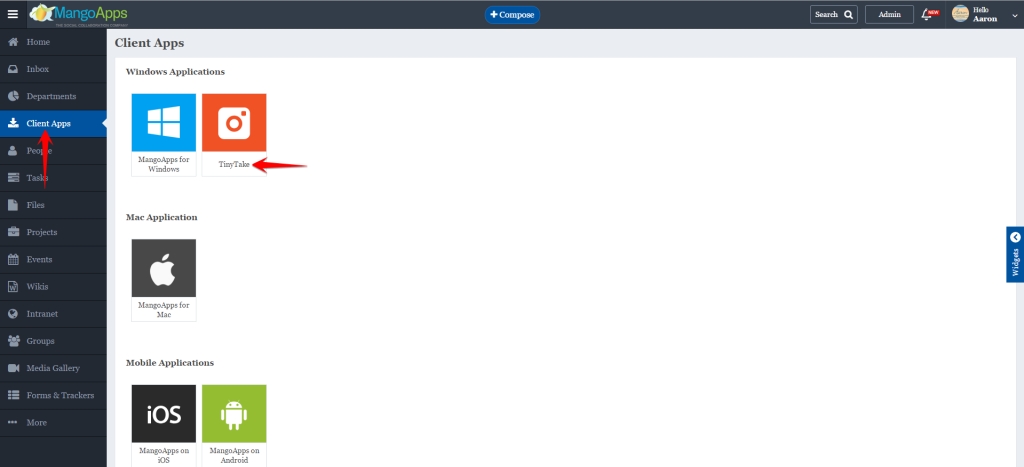
How do I install TinyTake?
How do I connect my MangoApps with TinyTake?
How do I capture an image?
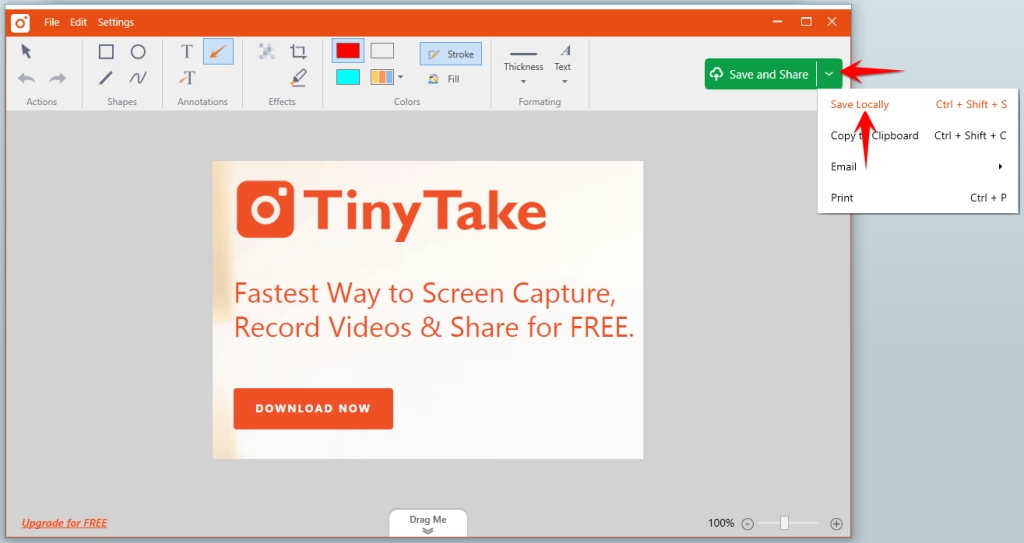
How do I save a capture locally?
How do I change the default key combinations for screen captures?
After I’ve captured an image, what shapes and text can I add?
How do I capture a video in TinyTake?
How do I post my TinyTake screen capture to MangoApps?
How to upload any type of files or folders?
Can I review, edit, and reupload (or save) images from capture history?
When I install TinyTake as the Computer’s Administrator, can other user accounts use it?
What is the “Drag Me” feature in TinyTake?
How do I pixelate a captured screenshot?
How do I report a problem?
What is TinyTake? TinyTake is a Windows screen capture utility that publishes images directly to your MangoApps domain.
Follow the on-screen instructions to install TinyTake to your Windows-based computer.
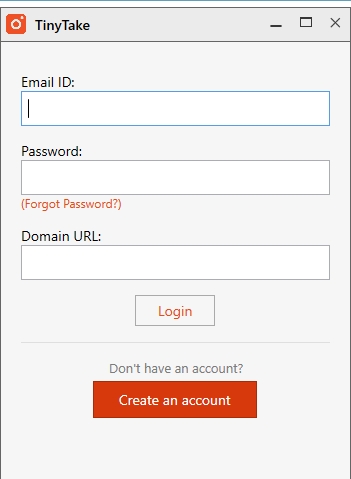
How do I connect my MangoApps with TinyTake? After launching TinyTake for the first time, it will ask you to log in. Enter your MangoApps credentials as prompted including User ID, Password, and Server URL as in this screenshot the click “Login”.
How do I save captures locally?
To save a capture locally, click on the icon annotated in the pictures below, depending on if you captured a video or an image. Video
Image
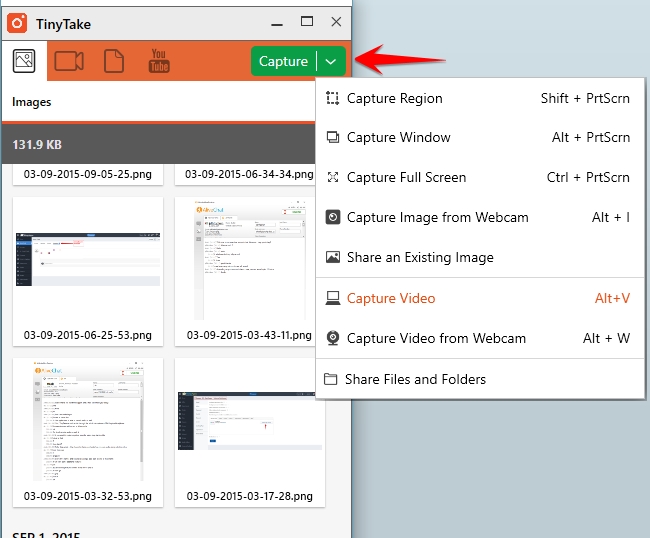
How do I capture an image? To capture an image with TinyTake, you can use the default Hot Keys which are:
<CTRL> + <PrtScrn> Captures the full screen.
<SHIFT> + <PrtScrn> Captures a region you specify.
<ALT> + <PrtScrn> Captures the current window.
Pressing the key combination will freeze your screen and show a capture tool if the “Region” or “Current Window” key combination was pressed. Click and drag to select a region or click on the window that you want to capture.
You can also use TinyTake gallery to select the capture option.
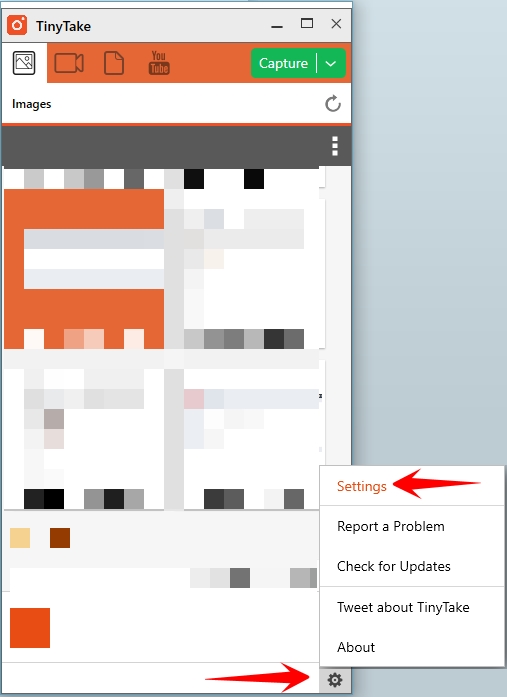
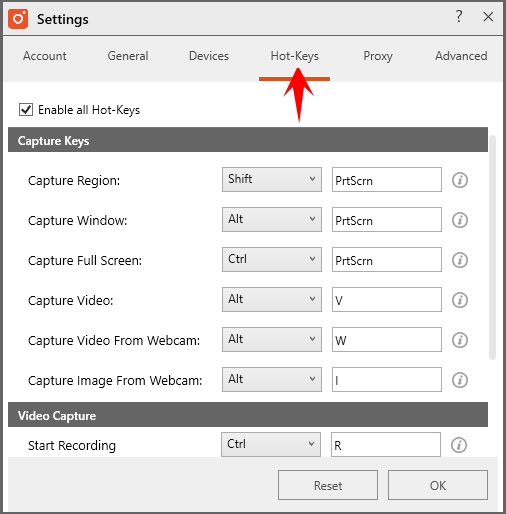
How do I change the default key combinations for screen captures? You can change the default key combinations for screen captures from TinyTake settings:
Open TinyTake Settings by clicking on the small gear icon and selecting “Settings”
2. From the “Hot-Keys” tab, click in the box of the hot key combination you want to change.
3. Touch any key in given the following limitations to change the Hot Key combination.
4. Click the “OK” button to register your changes and close the window.
After I’ve captured an image, what shapes and text can I add? With an image captured, you can add the following types of annotations to the image using the different UI tools:
Pointer: Use the cursor selection tool to select and move a shape or text that has already been added to your captured image.
Undo: Use the undo shortcut to undo your last edit to the image. There are multiple levels of undo.
Redo: Use the redo shortcut to reverse your last undo action. There are multiple levels of redo.
Draw Rectangle: Click and drag with the Draw Rectangle tool selected to add a rectangle to your captured image.
Draw Circle: Click and drag with the Draw Circle tool selected to add an ellipse to your captured image.
Draw Line: Click and drag with the Draw Line tool selected to add a line to your captured image.
Draw Pencil: Click and hold with the Draw Pencil tool selected to use freehand drawing on your image.
Draw Text: Click and drag to add a text box to your captured image then type in it to add the text.
Draw Arrow: Click and drag in the direction that you want the arrow to point to add it to your captured image.
Draw Arrow followed by Text : Click and drag to add an arrow followed by a text box.
Pixelate: Make an area of the picture unrecognizable or unreadable.
Crop: Select the region of the image that you want to keep.
Highlighter: Click and highlight a specific area of the image captured.
Arrow and Text Color: Change the color of the arrows along with the text.
Stroke: Change the Border color
Fill Color: Fills the shape you have selected with a color that you choose.
Border Thickness: With your shape selected, choose the line thickness of the outline of your shape.
Text size: Change the Text size
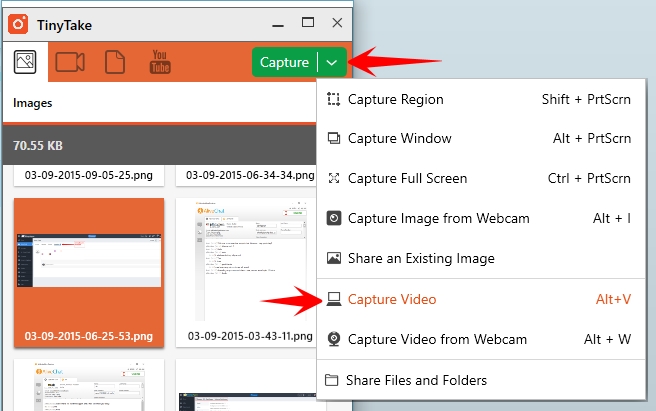
How do I capture a video in TinyTake? To capture a video, click the key combination (default is +) or choose “Capture Video” from the TinyTake Capture menu.
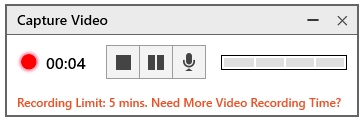
Then draw the region that will be shown in the video. When you are done recording, click the “Stop” button.
Then choose the “Save & Share” icon or the “Save” icon. To close the video without sharing or saving, choose the X.
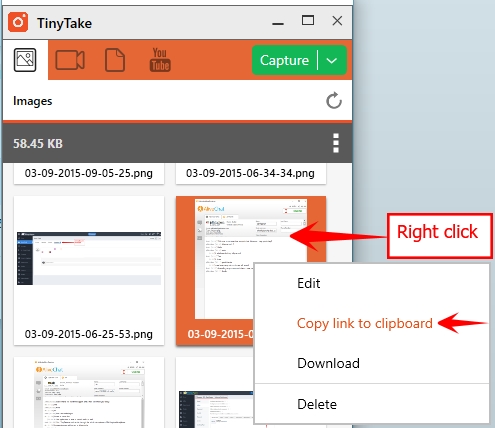
How do I post my TinyTake screen capture to MangoApps? Once a screen capture is done, you can upload the same to TinyTake server. It will generate a link of an image which can be copied by right click on the capture > copy link to clipboard.
Now share this link within MangoApps and user can view your capture online by clicking on the link.
How to upload any type of file or folders to TinyTake?
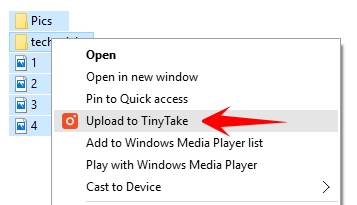
TinyTake runs in the background so uploading any file or folder from your computer is easy. To upload any type of file or multiple files or folders:
Highlight all the files of any type or folders you wish to upload to TinyTake
Right-click on one of the files or folders you highlighted and choose “Upload to TinyTake”.
Alternately you can choose “Bulk Share” from the TinyTake system tray menu to Drag & Drop your files.
3. Optionally rename the ZIP archive and click “Upload to MangoApps”.
4. A link to the zip archive will be placed on your clipboard. Paste it anywhere to share the contents of the ZIP archive with anyone.
5. The ZIP archive retains the folder structure so that when a user downloads and extracts it, the structure is intact. For example, if the “_TEST_3_LEVELS_DEEP” was bulk uploaded, when extracted the folder structure is recreated as in:
Can I review, edit, and re-upload (or save) images from capture history? Yes, you can view your “Capture History” to open previously uploaded or captured images to annotate them and re-upload or re-save them by:
Right-click the “TinyTake” icon in the system tray and choose “Capture History”.
In the capture history window, double-click the thumbnail of the image you want to continue to edit.
When finished editing, use the familiar TinyTake tools to re-upload or re-save the image.
When I install TinyTake as the Computer’s Administrator, can other user accounts use it? Yes, when TinyTake is installed by the admin account on a computer, the other users on that account will also have the ability to use TinyTake for their screen captures. This includes user accounts and guest accounts.
What is the “Drag Me” feature in TinyTake?
The Drag me feature in the image editor allows users to drag an annotated image directly from TinyTake to any application that supports images. This makes sharing an annotated image as an attachment much more accessible and faster than before. You can drag to the Windows File Explorer, your email compose screen or your favorite chat application. However, images shared in this manner are not uploaded to TinyTake and hence not available in the “My TinyTake Uploads” screen.
How do I pixelate a captured screenshot?
If you have ever felt the need to hide a certain area of the screen capture (because it shows sensitive or offensive information) the Pixelate feature is made for you. Simply select that area in your screen capture image and Pixelate will make it impossible to read/see in that area.
How do I report a problem?
To report a problem, right-click on the TinyTake app icon from the system tray and choose “More” -> ”Report a problem” this will send an email to TinyTake support containing log file along with other required information.
For dedicated help article link, refer: http://learn.tinytake.com/
How do I use my microphone to record audio with TinyTake?
Audio recording in TinyTake is restricted to the sound that comes in through the attached or built-in microphone on your computer. Sounds that play through the speakers of your computer will not be recorded unless the sound is picked up by the attached or built-in microphone or you use a loopback.
You can use the Windows Mic Training Wizard to test your microphone.
On your computer keyboard, click the + to open the “Run” dialog box.
In the “Open” box of “Run”, type:
rundll32.exe "%windir%\system32\speech\speechux\SpeechUX.dll", RunWizard MicTrainingChoose the type of microphone you have from the given radio buttons.
Make sure you can finish the rest of the steps including reading the phrase so the microphone is showing activity.
If no activity is shown or you receive an error that no microphone is detected, there is a problem with your microphone.
How Do I Record Sound Using Tinytake?
There are 2 ways to record sound through TinyTake based on what you’re trying to accomplish.
Narration over what is happening on your computer screen.
Capture the sounds playing through your speakers of what is happening on your computer screen.
Narration over what is happening on your computer screen.
To do narration, just connect a microphone to your computer or enable the built-in mic if your computer has one. Your voice (or the sounds around you) will be picked up by the microphone and included into the video you record from your computer screen. You can follow the steps in this article to test your microphone.
Capture the sounds playing through your speakers of what is happening on your computer screen.
When the whole point is to make a video that includes the audio that will play through the computer speakers, this is what you do:
Buy a (short) loop-back cable from an audio or electronics store (male 1/8 inch stereo connector to male 1/8 inch stereo connector).
Connect the speaker port on your soundcard (green) to the line in port on your soundcard (blue).
Start recording your computer screen. You will be prompted to choose an audio device if you have a microphone plugged in. Choose “Line In”.
Alternative to record the Audio
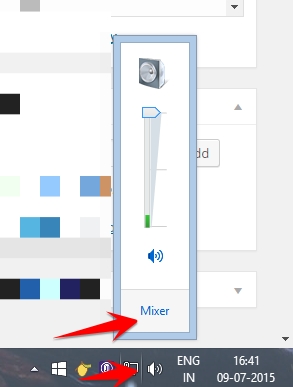
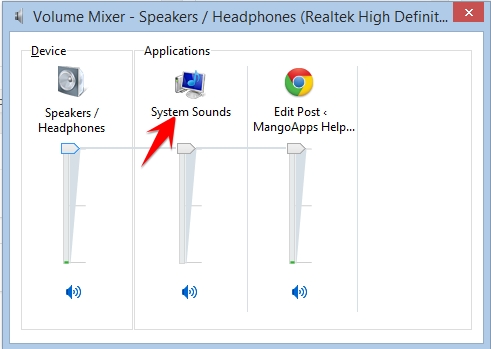
Go to Volume Mixer in the system tray
2. Go to System Sounds
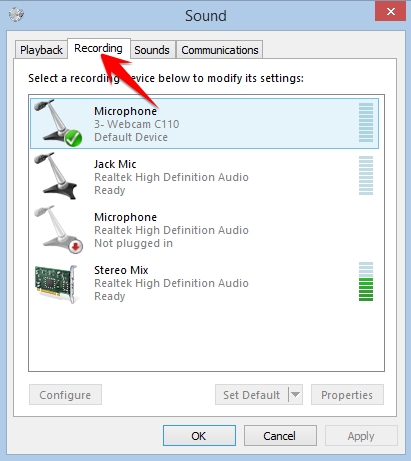
3. Go across to “Recording”
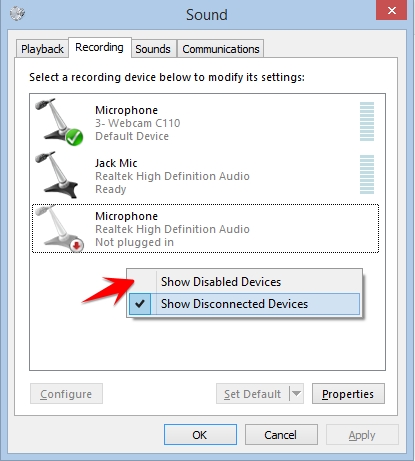
(If “Stereo Mix” isn’t shown, right click, and select “Show Disabled Devices”)
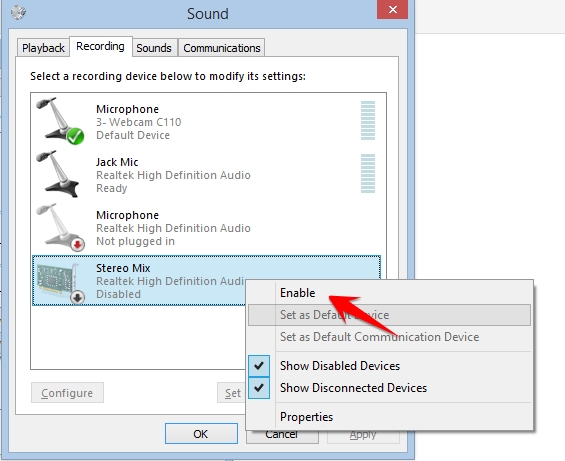
4) Enable “Stereo Mix”
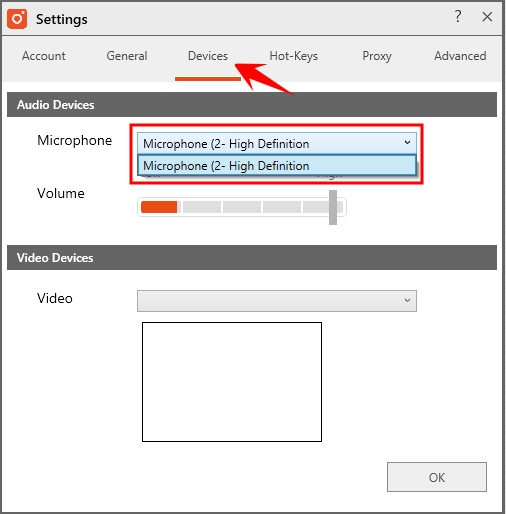
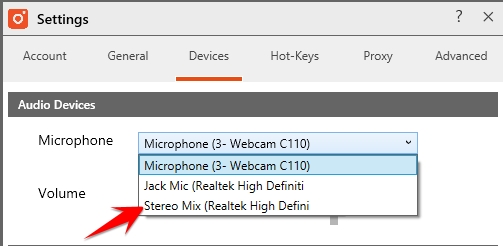
5) Open TinyTake settings 6) Go across to “Devices” tab 7) Select “Stereo Mix”
To hear the video you just recorded, unplug the loop-back cable from your speaker port (green) on your soundcard and reconnect your speakers to the speaker port.
Last updated
